Steam, a dynamic platform for downloading and playing online games, offers diverse communication features, including text and voice messaging, alongside the option to share images with friends. Yet, encountering issues like the failure to upload images on Steam is not uncommon. Refer to this guide for troubleshooting methods if you encounter difficulties uploading or sending images.
Fixing Steam’s Image Upload Failure
Possible Causes of the Issue:
- Incorrect Configuration Files
- Corrupted or Outdated Steam Files
- Weak Network Connection
- Windows Firewall or Third-Party Antivirus Blocking Permissions
- Insufficient Administrative Permissions
Method 1: Basic Troubleshooting
Before proceeding to advanced methods, attempt these basic troubleshooting steps, which often provide a simple solution:
1. Retry uploading the same image 1-2 times after a brief interval to eliminate temporary disconnection issues.
2. Upload a different image to verify if the problem lies with the previous image.
3. Resolve internet connectivity issues by restarting or resetting your router, using an Ethernet cable, and running the Network troubleshooter.
4. Rename the file, avoiding special characters, coded fonts, or fancy names in the filename, then attempt the upload.
5. Paste the image file into a different directory, rename it, and try uploading it again.
6. If the image was downloaded from an online source, remove any embedded links and attempt the upload again.
Method 2: Resize & Resave Image
If you encounter the “Steam image failed to upload” issue due to image size incompatibility with the Steam server, follow these steps:
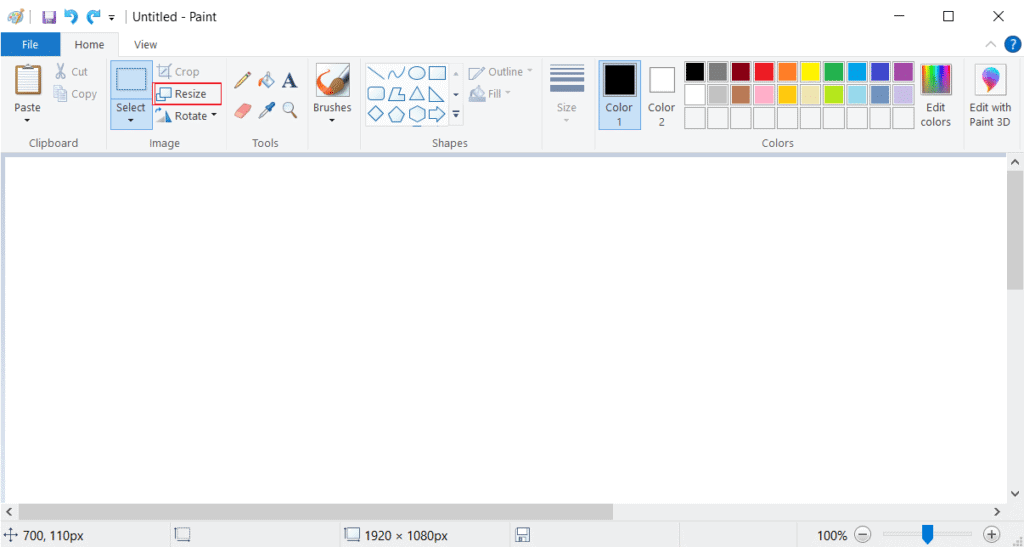
1. Right-click on the image file.Select “Open with” > “Paint,” as shown below.

Note: Alternatively, you can copy and paste the image into Paint.
Click on the “Resize” option, as indicated.
3. Adjust the resize values as needed and ensure that the box labeled “Maintain aspect ratio is unchecked.”
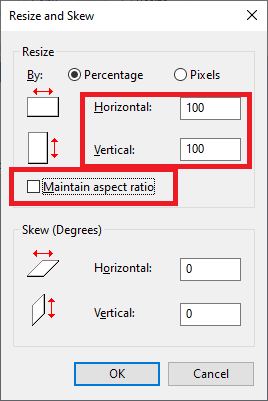
4. Click “OK” to apply the changes.
5. Save the file as a .jpeg format and proceed with uploading or sending the image.
Additional Tip: If the issue persists, save the file in another format, such as .png or .jpg.
Method 3: Run Steam As Administrator
If you lack the necessary permissions to upload your image in Steam, you won’t be able to proceed. Follow these steps to enable the required permissions:
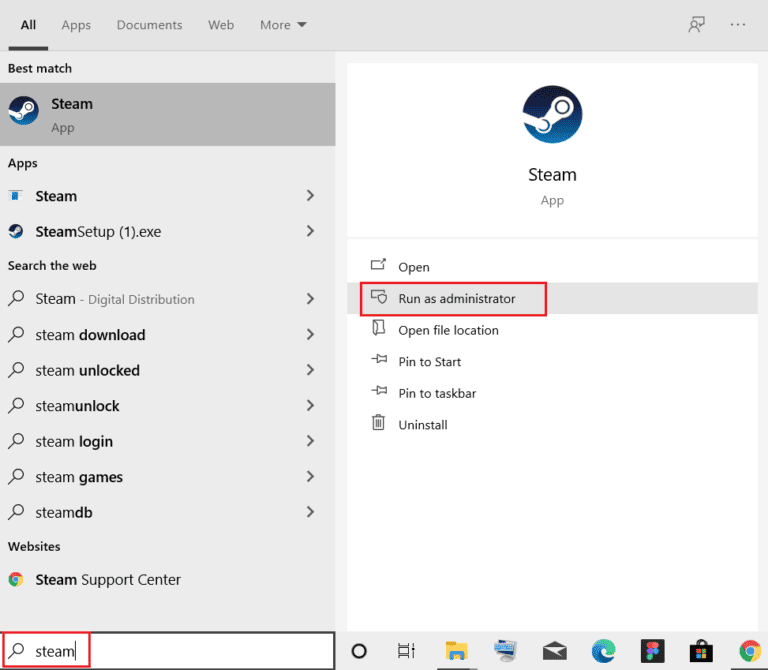
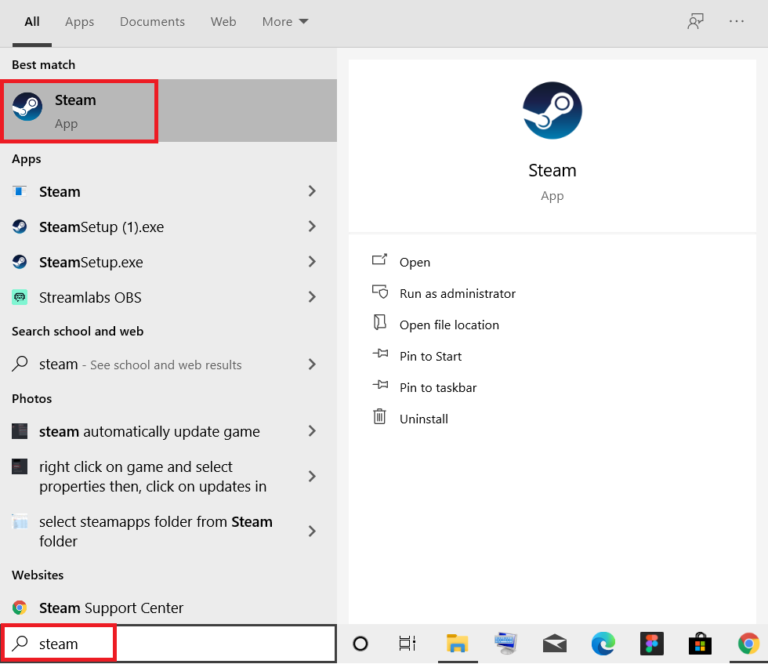
1. Press the Windows key and type “Steam” in the Search Bar.
2. Next, right-click on Steam and select “Run as administrator,” as depicted.
3. Try uploading or sending the image now to see if the issue of Steam being unable to upload or send images is resolved.
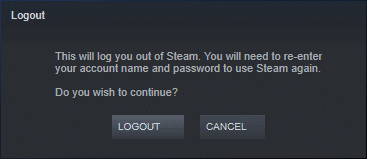
Method 4: Re-login to Steam
To resolve any temporary glitches with the Steam app, log out from the Steam client and then log in again. Here’s how:
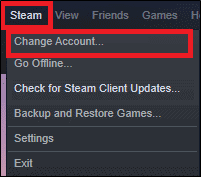
1. Open Steam and go to the Menu bar.
2. Click on “Steam” and then select “Change Account…” as shown below.
3. Confirm the prompt by clicking on “LOGOUT.”
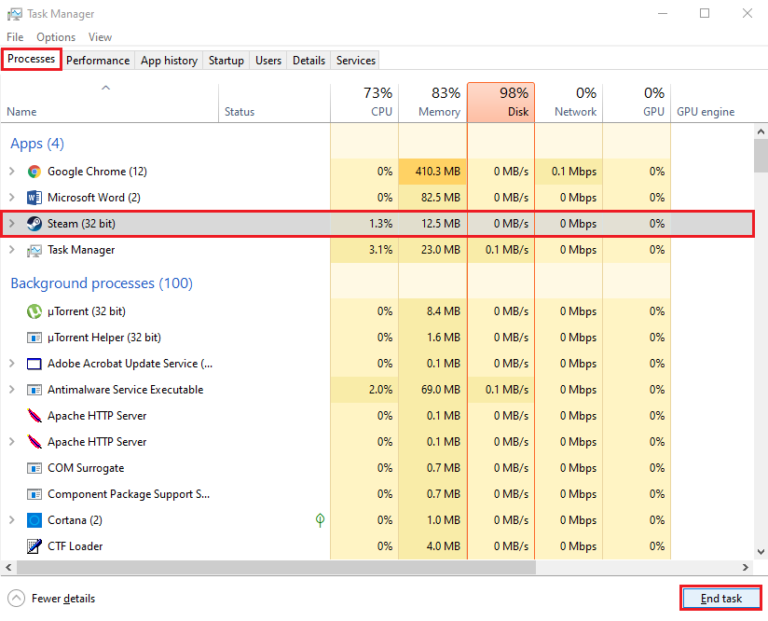
4. Close the Steam client.
5. Launch the Task Manager by simultaneously pressing Ctrl + Shift + Esc keys.
6. In the Processes tab, locate and select any Steam tasks running in the background (e.g., Steam (32 bit)).
6. Click on the “End task” button, as shown below.
8. Next, relaunch the Steam client and log back into your account.
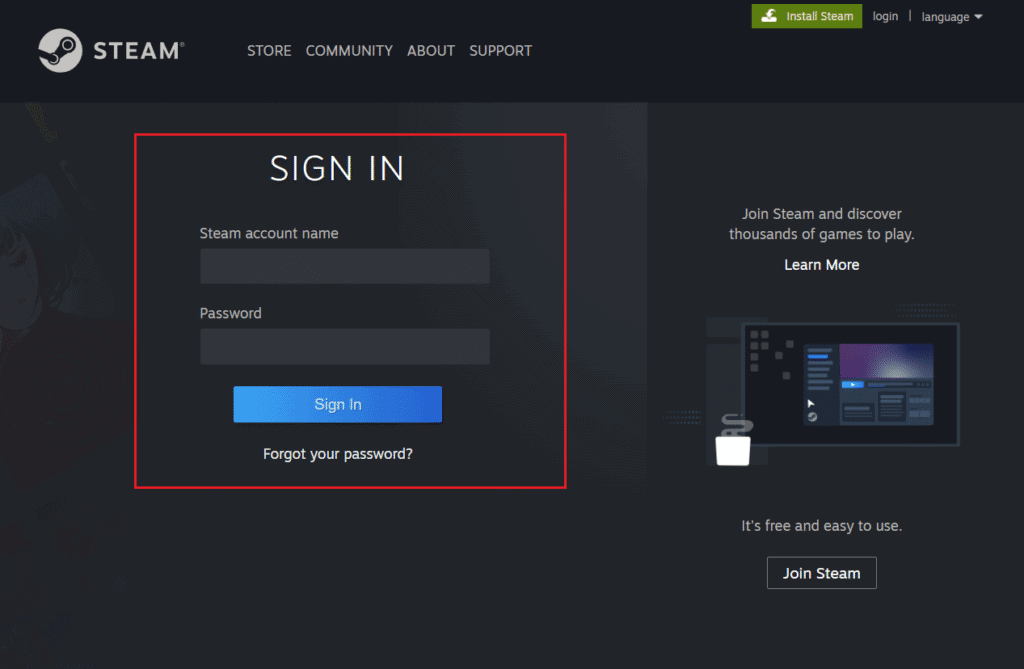
Method 5: Use Steam Web Client
If encountering issues with the desktop client, attempt sending images via the Steam web client instead:
1. Open your preferred browser (e.g., Google Chrome) and open a new tab.
2. Follow the provided link to access the Steam website.
3. Log in to your account using your Steam account name and password.
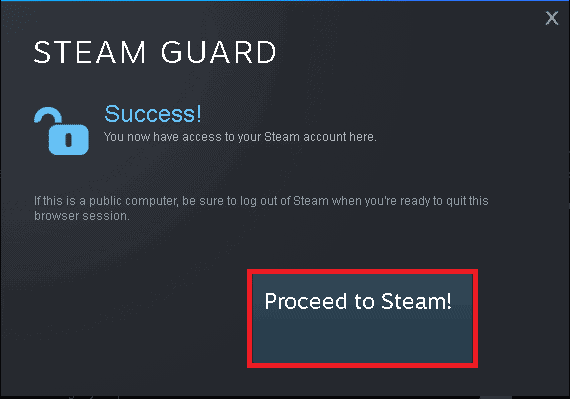
4. Input the passcode received in your registered email into the “Enter your code here” box.
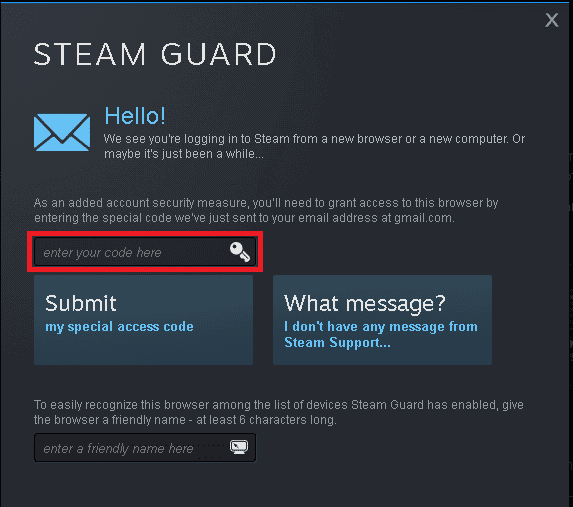
5. Click on “Proceed to Steam!” as indicated.
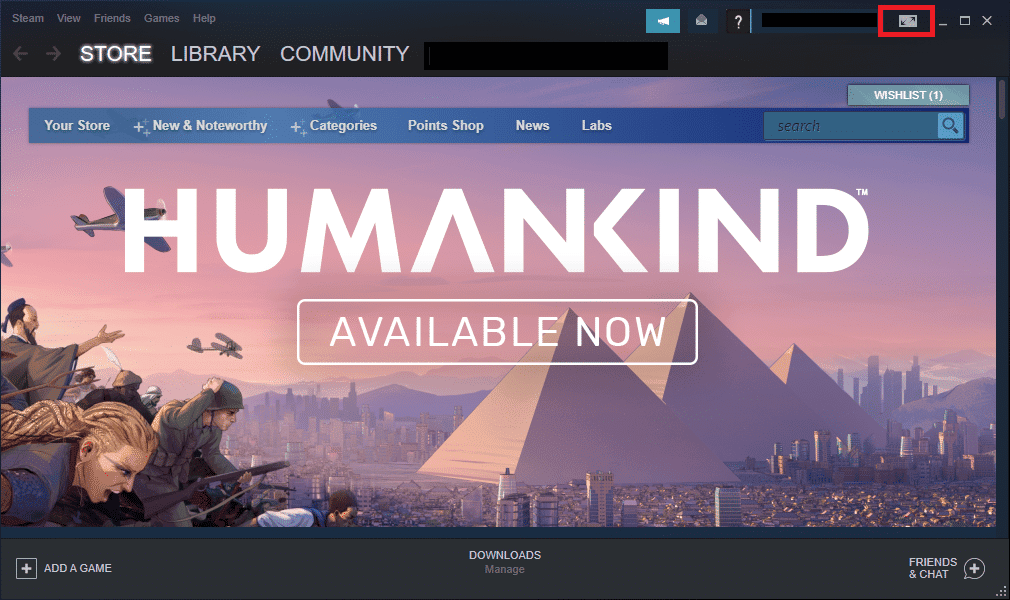
6. Navigate to the Steam Chat window by selecting “Chat.”
7. Proceed to send the desired image to your friend or upload it to your profile.
Method 6: Use Big Picture Mode
To resolve the mentioned issue, utilize the Big Picture Mode in your Steam client:
1. Open the Steam client and click on the Big Picture Mode icon highlighted below.
2. Next, open Steam chat and verify if you can now upload images.

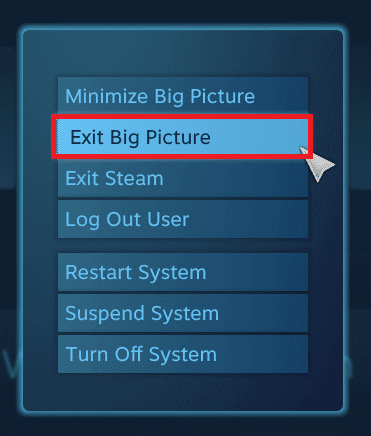
Note: To exit Big Picture Mode, click the Power icon and select the “Exit Big Picture” option, as illustrated.
Method 7: Change Steam Status to Online
If your status is offline, you may encounter the issue mentioned on your PC. To resolve this, change your Steam status to online by following these instructions:
1. Press the Windows key and type “Steam.” Then, press Enter to launch the Steam app.
2. Navigate to the Friends tab in the Menu bar.
3. Select the “Online” option, as highlighted below.
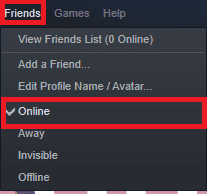
Verify if this resolves the “Failed to start upload: Image failed to upload” issue on your Windows 10 PC.
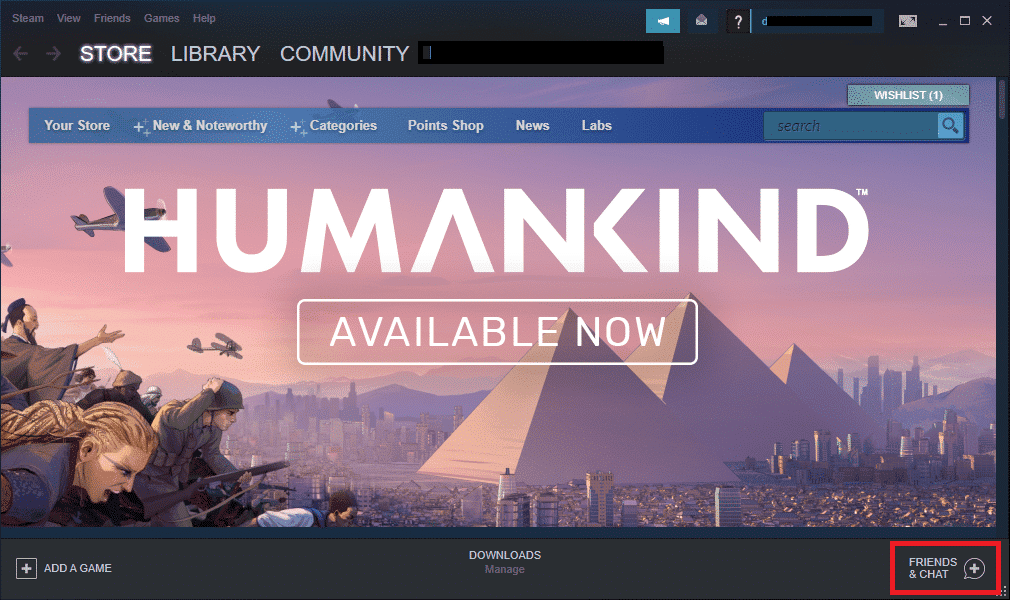
Method 8: Disable Compact Friends List & Chat View
To disable a feature in Steam called Compact Friends List & Chat View, which might be causing the “Steam cannot upload or send images” issue if accidentally enabled, follow these steps:
- Launch Steam and navigate to the “FRIENDS & CHAT” option located in the bottom right corner.
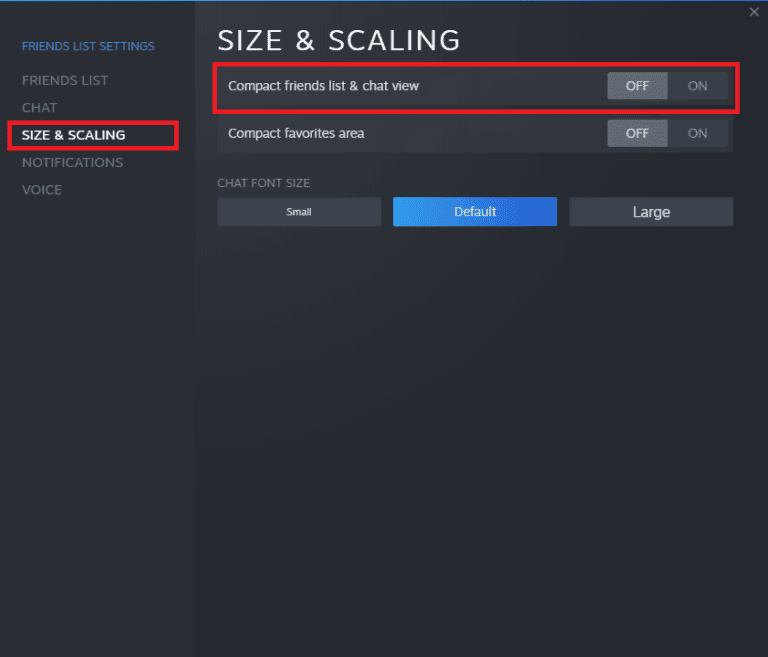
2. Click on the gear icon highlighted to open Settings.
3. Switch to the “SIZE & SCALING” tab in the left pane.
4. Turn OFF the toggle for the “Compact friends list & chat view” option, as illustrated.
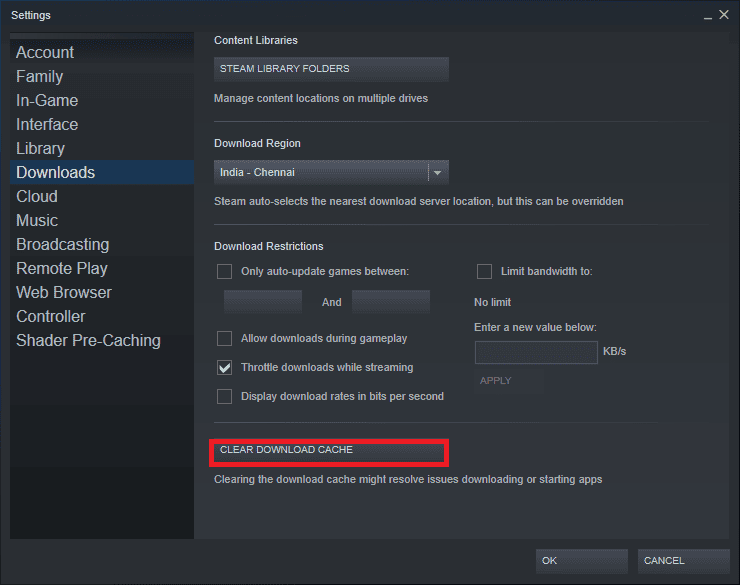
Method 9: Clear Download Cache in Steam
To rectify the “Steam image failed to upload” error by clearing the download cache, follow these steps:
1. Launch Steam as usual.
2. Then, click on “Steam” > “Settings,” as shown.

3. In the Settings window, go to the Downloads menu.
4. Click on “CLEAR DOWNLOAD CACHE,” as indicated.
Method 10: Disable Family View
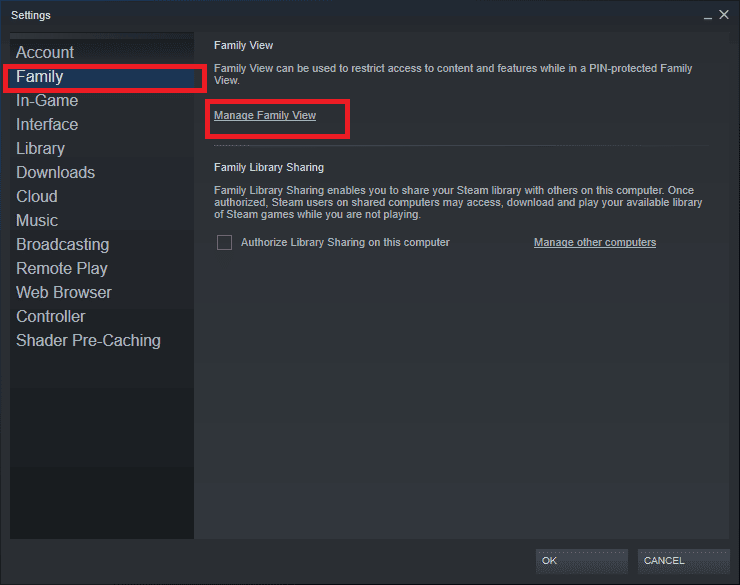
Sometimes, the Family View feature in the Steam Client can interfere with streaming games and uploading images. To disable Family View, follow these steps:
1. Launch Steam and navigate to Steam > Settings, as shown in the previous method.
2. Click on “Family” in the left pane and then select the “Manage Family View” option in the right pane.
3. Click on the “Disable Family View” button, as highlighted below.
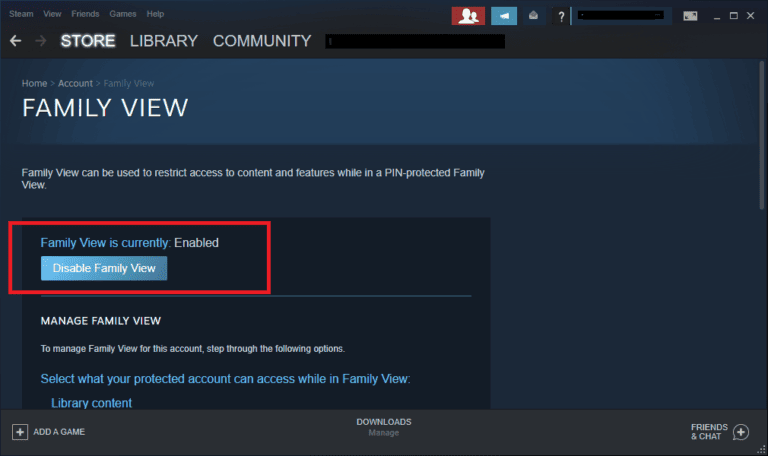
4. Relaunch the Steam client and check if the issue is resolved.
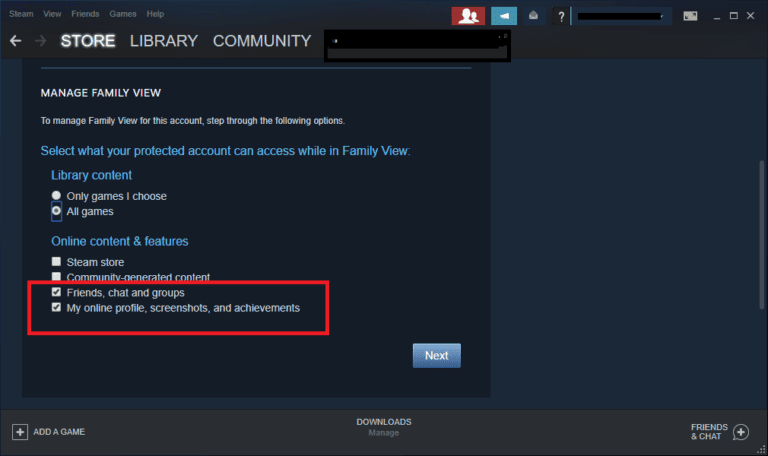
Pro Tip: Alternatively, in the Family View section, enable the following options under Online content & features:
- Friends, chat, and groups
- My online profile, screenshots, and achievements
Method 11: Join Beta Program
If you still encounter the issue after updating your Steam client, there might be a bug in the program. You could fix this by joining the Beta program of the Steam client:
1. Launch Steam and go to “Settings,” as previously described.
2. Switch to the “Account” tab and select the “CHANGE…” option, as shown.

3. Choose “Steam Beta Update” from the Beta participation drop-down menu.
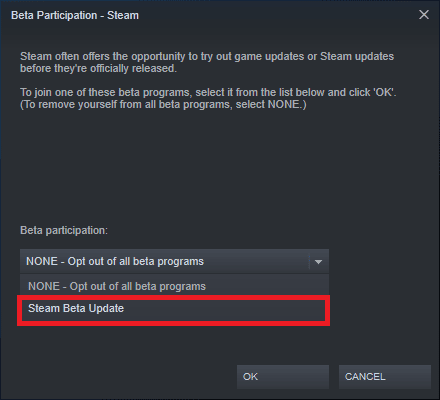
4. Click “OK” to save the changes.
5. Click “RESTART STEAM” to confirm and apply the changes.
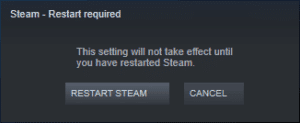
6. Relaunch Steam and check if the issue persists.
If the issue continues, repeat Steps 1 to 3 and select “NONE – Opt out of all beta programs.”
Method 12: Update Steam Client
If the server installation files are outdated, compatibility issues between the server and the client will occur, preventing Steam from uploading or sending images.
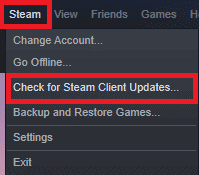
- Launch Steam and navigate to the menu bar.
2. Click on “Steam” and then select “Check for Steam Client Updates…”
3A. Steam – Self Updater will automatically download any available updates. Click “RESTART STEAM” to apply the update.
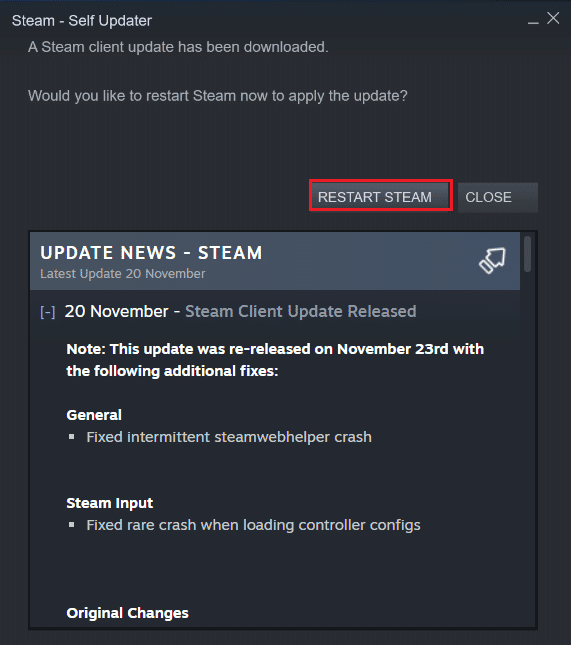
3B. A message saying “Your Steam client is already up-to-date” will be displayed if there are no updates.

Method 13: Resolve Third-Party Antivirus Interference (If Applicable)
Third-party antivirus software often blocks potentially harmful programs from running on your system. However, in some cases, it may also prevent Steam from uploading images due to connection gateway issues. To resolve this, temporarily disable your antivirus software.
Method 14: Change Proxy Settings
If your network connection blocks access to the Steam client, consider using an alternate connection. Alternatively, you can enable or disable your VPN/proxy network.
1. Exit Steam and close all related Steam applications from the Task Manager, as instructed in Method 4.
2. Press the Windows key and type “proxy.” Then, click on “Proxy settings” from the search results.

3. In the Proxy settings, turn off the toggles for the following options:
- Automatically detect settings
- Use setup script
- Use a proxy server
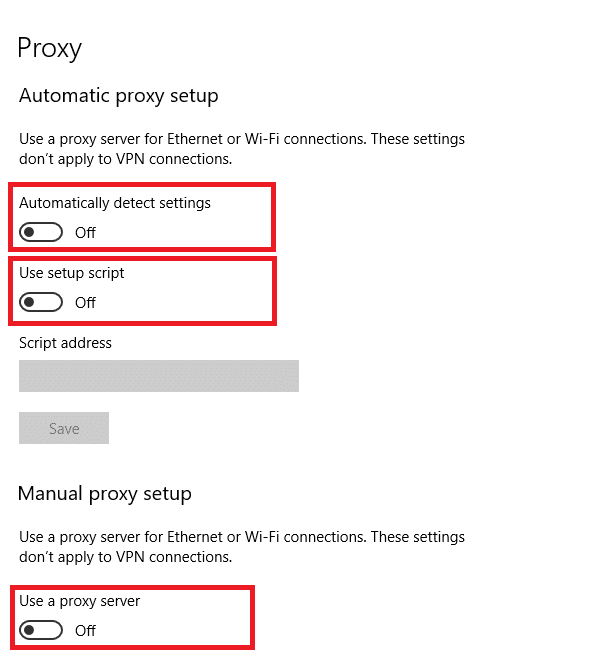
4. Now, launch the Steam client and try uploading images.
Note: If the issue persists, use a VPN client or connect your system to another network, such as Wi-Fi or a mobile hotspot, to see if the problem is resolved.
Method 15: Reinstall Steam
Any common glitches associated with a software program can be resolved by completely uninstalling and reinstalling the application. Here’s how to fix the “image failed to start upload” issue:
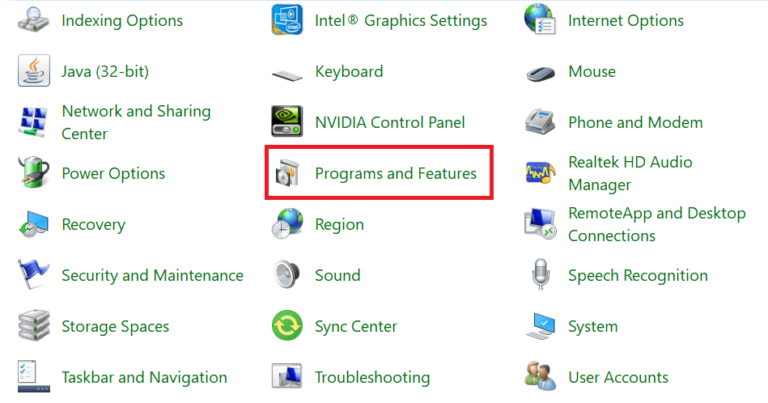
- Launch Control Panel as instructed in Method 13.
- Select “View by” > “Small icons” and click on “Programs and Features” as shown.
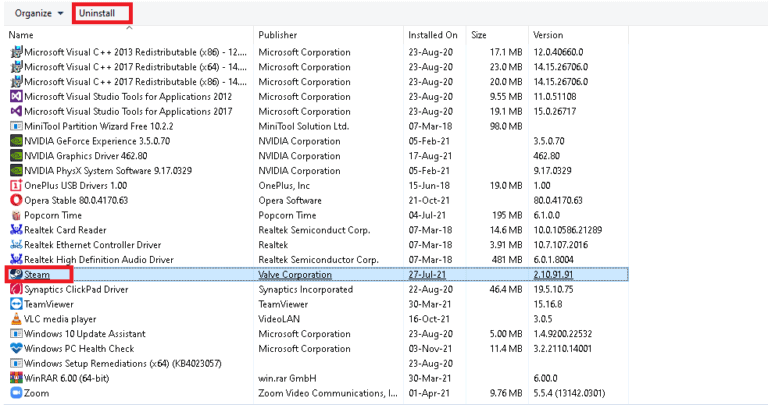
3. Click on “Steam” and select the “Uninstall” option, as depicted in the picture below.
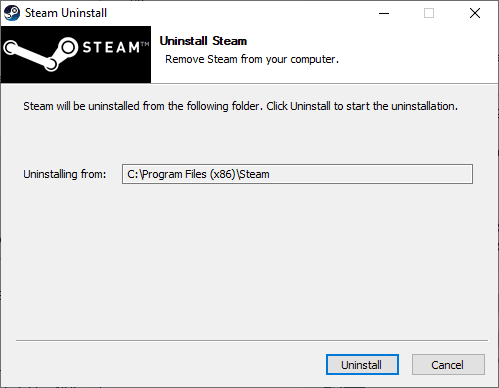
4. click “Uninstall” to remove Steam in the Steam Uninstall window.
5. Restart your computer once you have completed uninstalling Steam.
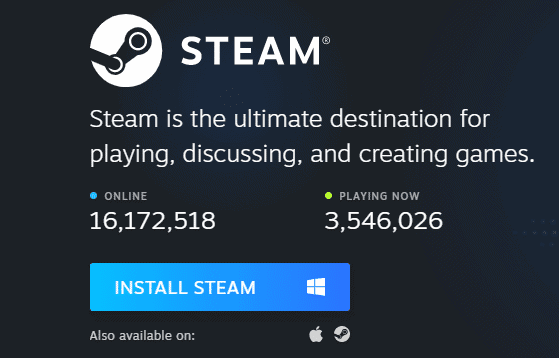
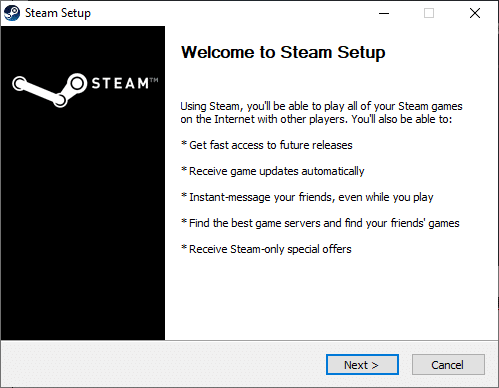
6. Go to the Steam website and click on “INSTALL STEAM,” as shown. The SteamSetup file will be downloaded to your system.
7. Navigate to your Downloads folder and open the Steam Setup file
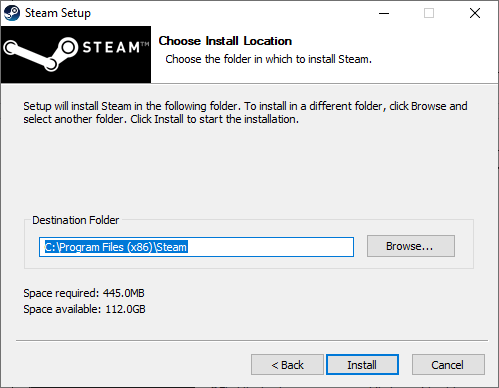
8. click the “Next” button in the Steam Setup wizard.
9. Choose the destination folder by using the “Browse…” option, then click “Install.”
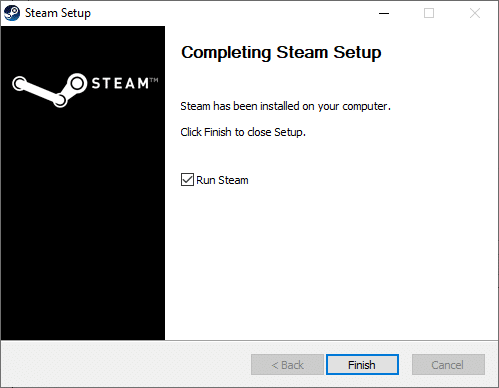
10. Wait for the installation to complete, then click “Finish,” as shown.
We hope this guide helped you resolve your system’s Steam image upload issue. Let us know which method worked best for you. If you have any queries or suggestions regarding this article, please drop them in the comments section. We’re here to help!
Frequently Asked Question
Why can’t I upload images on Steam?
This issue can arise due to various reasons, such as incorrect configuration files, corrupt or outdated Steam files, a poor network connection, firewall or antivirus interference, or a lack of administrative permissions.
How do I clear the Steam download cache?
To clear the Steam download cache, go to Steam > Settings > Downloads, and click on “CLEAR DOWNLOAD CACHE.”
What should I do if I don’t have the required permissions to upload images?
Run Steam as an administrator by right-clicking on the Steam icon and selecting “Run as administrator.”
Can using a VPN or proxy affect my ability to upload images on Steam?
Yes, a VPN or proxy can sometimes interfere with Steam’s connection. You may need to disable it temporarily or switch to a different network.
How do I disable Family View in Steam?
Go to Steam > Settings > Family, and click on “Manage Family View.” Then, disable Family View.
What if my Steam client is outdated?
You can check for updates by going to Steam > Check for Steam Client Updates. If updates are available, Steam will download and install them automatically.
How can I reinstall Steam without losing my game data?
Before uninstalling Steam, back up your game data by going to Steam > Backup and Restore Games. After reinstalling Steam, restore your game data using the same menu.
Conclusion
We hope this guide has helped you resolve your system’s Steam image upload issue. By following these 15 methods, you should be able to identify and fix the problem efficiently. Let us know which method worked best for you. If you have any questions or suggestions, feel free to share them in the comments section. We’re here to assist you!